IBM’s Power10 Private Cloud Rack for Db2 Warehouse Solution – Chapter 4: Enabling Q Replication
By Kaustubh Sabnis, Serge Bourbonnais, Jana Wong
IBM’s Power10 Private Cloud Rack (P10 PCR) for Db2 Warehouse is the latest iteration of the Integrated Analytics System (IIAS). It is an on-premises solution that is designed to be deployed in a variety of environments, including customer data centers. The architecture is fully validated and pre-tested to meet specific performance and reliability requirements. Its modular and scalable design allows it to accommodate increasing data volumes and evolving business needs.
As data systems grow in complexity and scale, the need for reliable mechanisms to ensure high availability and disaster recovery becomes increasingly important. Q Replication addresses this need by enabling near real-time data synchronization between environments. Within the P10 PCR architecture, it serves as a key tool for maintaining data consistency, reducing downtime, and supporting operational continuity across distributed systems.
As the fourth installment in our P10 PCR blog series, this post builds upon the foundational concepts introduced in Introducing IBM’s Power10 Private Cloud Rack for Db2 Warehouse Solution: Architecture, Scalability, and Performance, the in-depth performance analysis presented in Power10 Private Cloud Rack for Db2 Warehouse Solution: Performance Deep Dive as well as the Step-By-Step Guide to Engage IBM Support. For those preparing their environments, we also recommend reviewing the comprehensive Deployment Guide, which covers the setup process for Db2 Warehouse, along with the hardware, software, and infrastructure prerequisites for Power10-based systems.
In this blog post we provide a technical walk-through of how to enable Q Replication within the P10 PCR environment. It outlines the necessary steps to configure and deploy Q Replication for scenarios involving disaster recovery, high availability, and continuous data availability. The guide also covers the underlying architecture and operational considerations, offering a practical reference for teams implementing Q Replication in their infrastructure.
1. Pre-Requisites
- Db2
Db2u (Db2 Universal Container) is a containerized version of IBM's Db2 database. It’s built to run in modern cloud environments, like Red Hat OpenShift.
Two instances of Db2U[J1] with active Db2 databases are required to support replication between the source and target systems. Before enabling the Q Replication add-on, ensure that the Db2 custom resource (CR) for each instance is in the Ready state.
To verify the status, use the following command (assuming the Db2 deployment is in the db2 namespace):
- Network
Ensure network connectivity between the two P10 PCR systems for Db2 Warehouse, with a recommended minimum network throughput of 10 Gbps.
If firewalls are in place, confirm that specific NodePorts are open for bi-directional communication. These ports are dynamically assigned in the 30,000 range and will be identified after the Q Replication add-on is enabled. - Storage
In the P10 PCR environment, storage is managed using the IBM Spectrum Scale Container Storage Interface (CSI) driver. When enabling the Q Replication add-on, a shared ReadWriteMany (RWX) storage class must be specified for the qrepdata volume. In this setup, the storage class ibm-spectrum-scale-scratch-rwx-sc is used.
During the enablement process, you will also need to define the amount of disk space to be provisioned for the persistent volume claim (PVC) associated with qrepdata. This mount point is used not only for staging MQ queue data and Q Replication metadata, but also for storing supplemental logs. These logs, generated by Db2 in the form of external binary tables, are required for multi-row insert, update, and delete operations on column-organized tables.
It is important to allocate sufficient disk space to the qrepdata mount to accommodate periods when the capture program or replication set is paused. A general guideline is to provision enough space to retain 24 to 48 hours of captured change data. For example, if the system generates approximately 1 TiB of uncompressed changes per day, allocating 2 TiB (2048 GiB) of storage would provide a safer buffer.
- Privilege
A Kubernetes or OpenShift cluster administrator should be able to run a script to enable the Q Replication add-on. This script updates the specifications of the db2u-cr custom resource.
Once these prerequisites have been met, you can proceed to enable the Q Replication add-on on each system, one side at a time.
For a more in-depth discussion on planning for Q Replication, refer to the IBM Documentation linked below. It covers key topics such as replication key requirements for row- and column-organized tables, workload and data type considerations, supported DDL operations, and strategies for initial table loading: IBM Documentation – Planning for Data Q Replication
2. Deployment
Enabling the Q Replication add-on in the P10 PCR environment will result in a temporary database outage. During this process, the Db2 database will be restarted, and it typically takes approximately 20 to 30 minutes for the Db2 pods and the associated custom resource to return to the Ready state. It is recommended to schedule this activity during a planned maintenance window of at least 30 minutes.
To begin, download the enablement script (bludr-enable-qrep-addOn-db2u.sh) from the following IBM Support page: IBM Support – Shell Script to Enable Q Replication
After downloading the script, follow the documented steps to:
- Enable the Q Replication add-on,
- Expose the required NodePorts on the HAProxy running on the bastion or infra host,
- Activate the source for replication.
Detailed instructions are available in the IBM Documentation:
IBM Documentation – Deploying Replication
These steps must be completed on both the source and target systems participating in the replication setup before proceeding with further configuration.
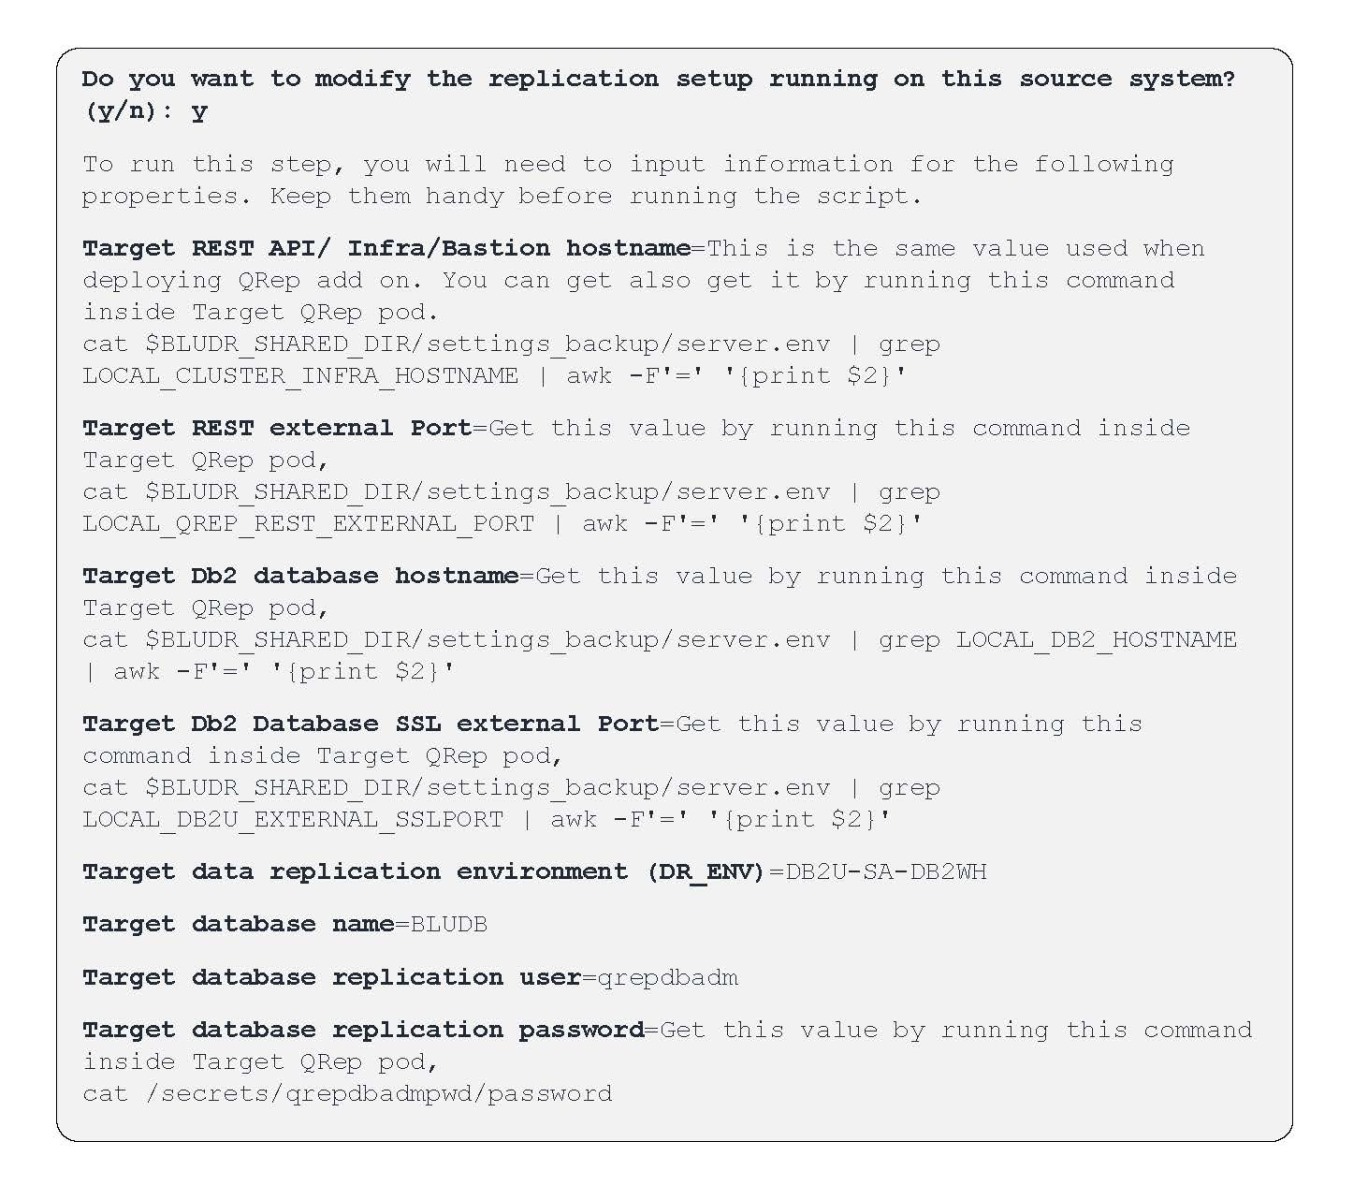
During the enablement and activation process, you may be prompted to provide specific configuration details, which are outlined in the following section.
- Storage Class
The storage class used to provision the qrepdata persistent volume claim (PVC) should be ibm-spectrum-scale-scratch-rwx-sc. When running the enablement script, select the option that corresponds to this storage class. The following command can be run to confirm the storage class name:
- namespace=db2
The default Kubernetes/OpenShift namespace for P10 PCR deployments is typically db2. If a custom namespace is used, consult your Kubernetes/OpenShift administrator to confirm the correct value. - db2uinstance=db2u-cr
The default name for the Db2U instance custom resource is usually db2u-cr. If a different name has been configured, you can verify it by running the following command:
- Bastion Hostname/Infra Hostname
One critical configuration parameter required during the Q Replication add-on enablement is the hostname used to communicate with the Q Replication REST server. This hostname must be reachable (pingable) from the remote site, and the network should allow bi-directional communication to and from this address.
It is recommended to use the virtual hostname for this purpose. For example, running the hostname -A command on the bastion or infrastructure host might return values such as: db2u-bastion.hs db2u-bastion.pbm.ihost.com db2u-vip.pbm.ihost.com
In this case, you should use db2u-vip.pbm.ihost.com when prompted by the enablement script with the message: "Please type Cluster Infra/Bastion Hostname"
3. Configure Replication
Before you can start replication, there are a few steps that need to be performed in order to configure it. One of the key steps is to associate (or add) a target site for the local (source) database server.
3A. Exchange SSL Certificates between two sites.
The first step is to exchange Secure Socket Layer (SSL) certificates for QRep/Bludr REST API Server, IBM MQ and Db2 Server between the two sites participating in the replication setup.
To perform this step, follow steps 1, 2, and 3 outlined in the IBM documentation:
IBM Documentation – Configuring Replication
Execute the following script using Option 2:
$BLUDR_HOME/scripts/bin/bludr-perform-target-actions.sh
Note: $BLUDR_HOME is typically set to /opt/ibm/bludr.
During execution, the script will prompt for user input. Respond with 'y' yes, when running the scripts for the local system.
3B. Add Target
After completing the certificate exchange, the next step is to add (or pair) a target system from the local (source) environment. To do this, follow step 4 in the IBM documentation: IBM Documentation – Configuring Replication
Run the following script with Option 3 to add the target:
$BLUDR_HOME/scripts/bin/bludr-perform-target-actions.sh
After adding the target, use Option 1 to list the configured targets and confirm that the pairing was successful.
4. Operations
After the target has been added to the local (source) database instance, the next steps involve configuring the replication components. This includes creating a replication set, adding table subscriptions, and lifecycle management of the subscriptions and replication set itself. These tasks are part of the operational management of the replication environment.
4A. Create Replication Set
To create an empty replication set, run the following script with Option 5 from the menu:
$BLUDR_HOME/scripts/bin/bludr-perform-replication-set-actions.sh
You will need to provide the Target Db2 database hostname and the Target Db2 Database SSL external Port that was used in prior step to add the target, along with the name of the Replication Set. When naming the replication set, ensure the name is no more than 8 characters and does not include special characters such as -, _, &, *, or '. For reference, see steps 5 and 6 in the IBM documentation: IBM Documentation – Configuring Replication
4B. Delete Replication Set
To delete a replication set, run the following script with Option 6:
$BLUDR_HOME/scripts/bin/bludr-perform-replication-set-actions.sh
You will need to provide the name of the Replication Set you want to delete, as well as the name of the corresponding Consistency Group (CG) associated with the Replication Set.
You can get these values by running the same script and select Option 1 to List Replication Sets.
4C. Start (or Resume) Replication Set
When a Replication State is in Inactive State or stopped/paused, it can be started/resumed via:
$BLUDR_HOME/scripts/bin/bludr-perform-replication-set-actions.sh
Select Option 3 from the menu to start or resume the replication set.
4D. Stop (or Pause) Replication Set
When a replication set is in the Active state, it can be either stopped or paused via:
$BLUDR_HOME/scripts/bin/bludr-perform-replication-set-actions.sh
Select Option 4 from the menu to stop or pause the replication set.
4E. Add table subscriptions
After creating an empty replication set, the next step is to add tables—either all tables from a specific schema or selected individual tables—to the set. This is done by running the following script:
$BLUDR_HOME/scripts/bin/bludr-add-tables-to-replset.sh .
Before executing the script, you must prepare an input file that lists the schema and table names to be included in the replication set.
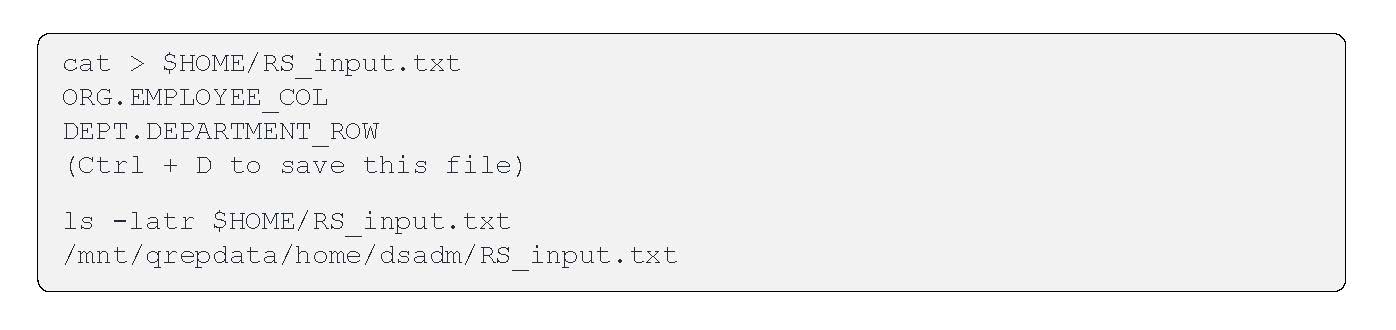
Note the full path of this file, which will need to be entered while running this script.
This script accepts an input file containing the names of schemas and tables to be added. Each entry must be in UPPERCASE, with the schema and table name separated by a period (e.g., ORG.EMPLOYEE_COL). List each entry on a new line.
Select the appropriate number for Replication Set Name that you want to add tables to.
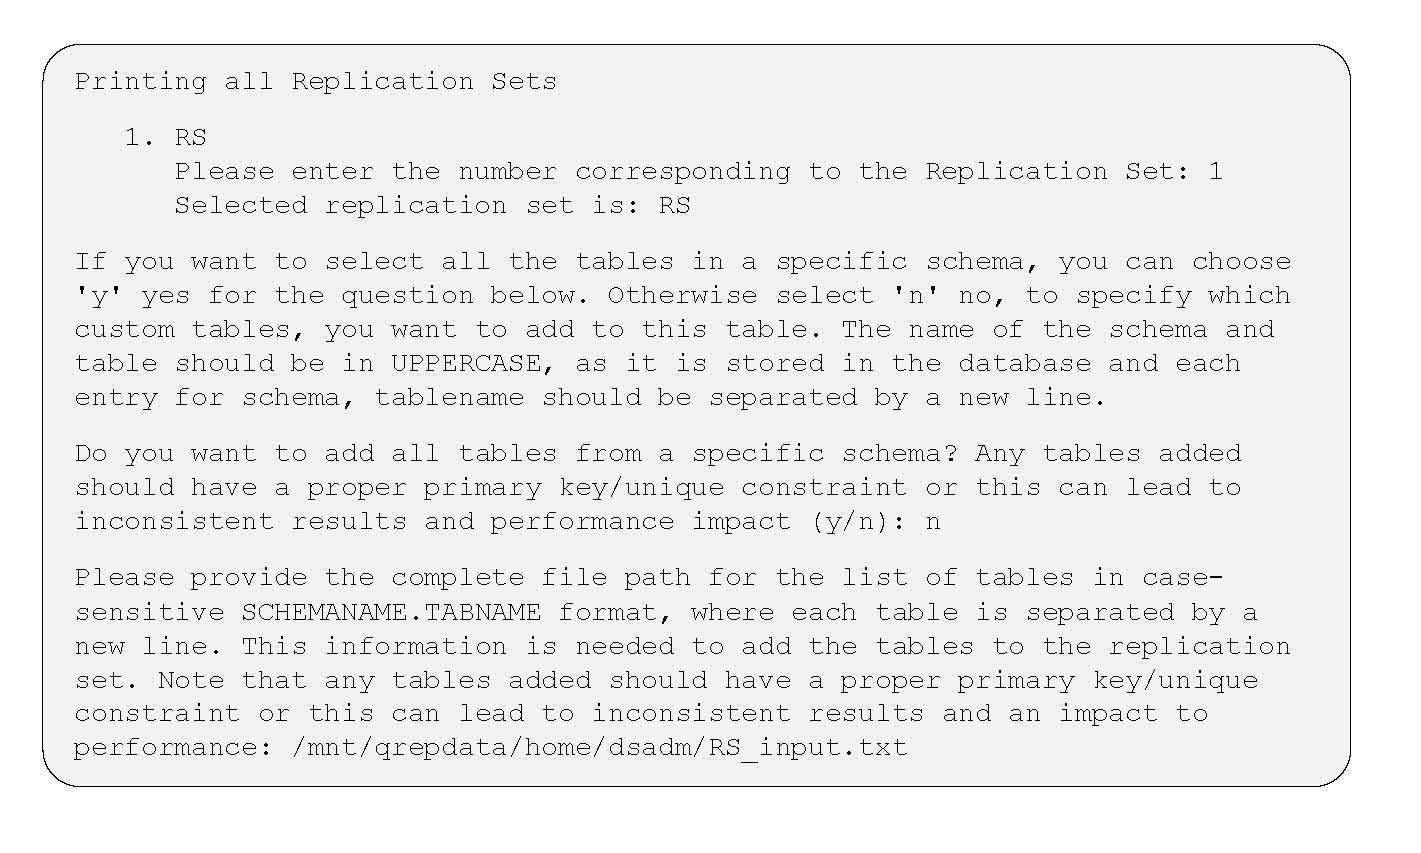 If you intend to perform an initial load for the tables being added to the replication set, enter 'y' (yes) when prompted. Otherwise, to replicate only new INSERT, UPDATE, DELETE, or TRUNCATE operations going forward, enter 'n' (no).
|
Do you want to load all tables added to replication? (y/n): y . |
If you want to automatically start the table subscriptions for the newly added tables to the replication, select 'y' yes to the question below.
|
Do you want to start all tables added to replication? (y/n): y |
4F. Start table subscriptions
If you selected 'n' no to the question above [Do you want to start all tables added to replication? (y/n): n], then you also have the option to start table subscription at a later point in time by calling the script: $BLUDR_HOME/scripts/bin/bludr-start-tables-in-replset.sh.
4G. Stop table subscriptions
To stop table subscriptions, you can run the script, $BLUDR_HOME/scripts/bin/bludr-stop-tables-in-replset.sh
4H. Remove tables from Replication Set
In order to remove specific tables from the replication set, you can run the script $BLUDR_HOME/scripts/bin/./bludr-remove-tables-from-replset.sh.
This script also accepts an input file containing the names of schemas and tables to be removed. Each entry must be in UPPERCASE, with the schema and table name separated by a period (e.g., ORG.EMPLOYEE_COL). List each entry on a new line.
5. Reverse Replication Configuration
Q Replication can also be configured on the target site to support replication from the target back to the source system. This setup, known as reverse replication, is optional and should be implemented only if there is a specific requirement for bidirectional data replication.
The configuration process for reverse replication is identical to the steps outlined in the Configuring Replication section but must be executed on the target site instead of the source.
6. Monitoring Replication
A basic method for monitoring replication is to run the following script on the target context Q Replication pod:
$BLUDR_HOME/scripts/bin/bludr-simplified-monquery.sh
This script provides key replication metrics, including:
- Active and inactive replication sets
- Number of active/inactive table subscriptions per set
- Identification of inactive table subscriptions
- Latency and throughput statistics over the past 24 hours
For more detailed monitoring and diagnostics, refer to the IBM documentation on Q Replication control tables and event publishing: IBM Documentation – Control Tables for Q Replication
7. Automation Watchdog
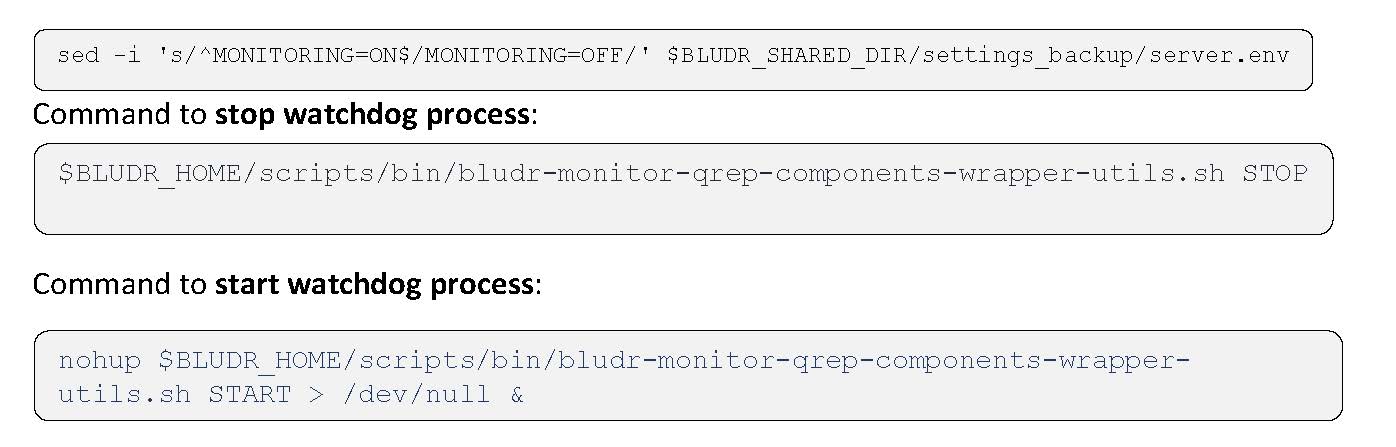
An automated watchdog process (bludr-monitor-qrep-components-wrapper-utils.sh) is included to continuously monitor key components of the replication environment, such as MQ managers (Capture Queue Manager – CQM, and Apply Queue Manager – AQM), asnqcap (capture program), asnqapp (apply program), and Bludr REST API server. If any of these components stop unexpectedly, the watchdog attempts to restart them automatically.
In certain scenarios, such as planned maintenance or troubleshooting, it may be necessary to stop the watchdog to prevent automatic restarts. This can be done by executing the command below, or by temporarily disabling it by setting MONITORING=OFF in the server.env file.
When QRep container is started, it also executes readiness probe (bludr-container-readiness.sh), which will mark the container as ready or not. When the container is started, it also starts the Bludr/QRep REST API Server process.
8. License
Q Replication on the Power10 Private Cloud Rack (P10 PCR) for Db2 Warehouse includes a temporary 90-day trial license, which is automatically applied when Q Replication is enabled. To apply a permanent license, follow the steps below:
- Download the IBM InfoSphere Data Replication V11.4 Q and SQL Replication Activation Kit for Db2 V12(Part Number: M0NHVML) from IBM Passport Advantage. The downloaded file is named: IS_DataRep_11_4_DB2V12_Act_PrdDoc.tar
- Extract the contents of the archive. The license file is named: iidr_db2_v121.lic
- Transfer the license file to the bastion or infra node of the OpenShift (OCP) cluster.
- Run the following commands to apply the permanent Q Replication license.
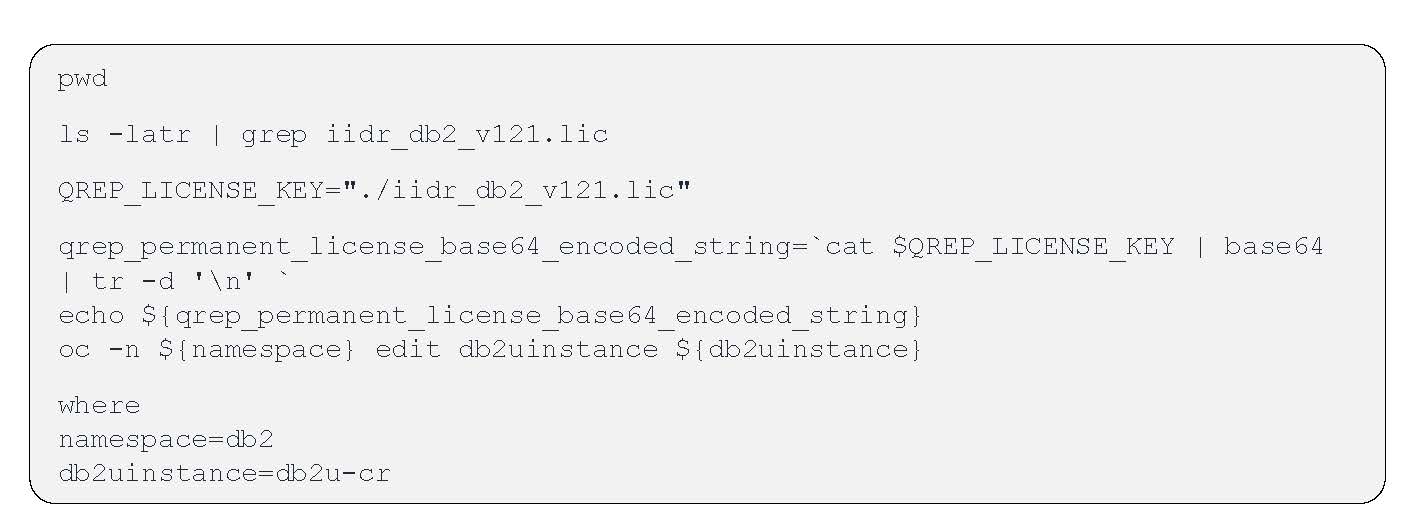
If your specific namespace or db2uinstance have different names, then you can substitute the above with those values. Inspect if there is any license value in path /spec/addOns/qrep/license/value. Then add permanent license using the kubectl patch command below.

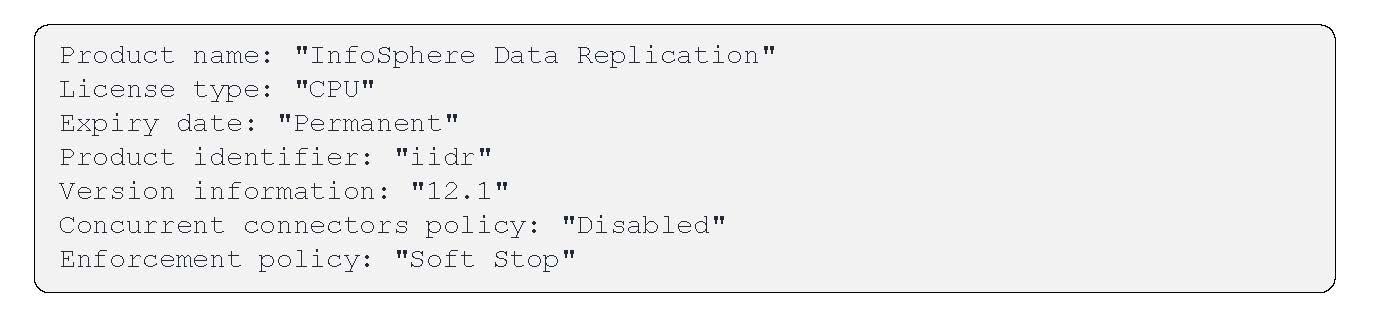
To verify if the permanent license is applied, run db2licm -l from inside the qrep pod. If applied successfully, you should see the following output:
Conclusion
In conclusion, enabling Q Replication on the Power10 Private Cloud Rack for Db2 Warehouse involves a series of structured steps, including prerequisite validation, deployment, configuration, and operational setup. When properly implemented, Q Replication supports high availability, disaster recovery, and continuous data synchronization between systems. Following the procedures outlined in this guide helps ensure a reliable and maintainable replication environment suited for enterprise data workloads.
About the Authors
Kaustubh Sabnis is a Senior Software Engineer within the Q Replication Development team. He currently leads a team focused on modernization, containerization and REST API development for Q Replication technology. Kaustubh has been with IBM for over 18 years and has a Masters in Computer Science. His focus areas in the past have been around Data Engineering and Engineering Management. Kaustubh can be reached at Kaustubh.Sabnis@us.ibm.com
Serge Bourbonnais is a Senior Technical Staff Member at IBM’s Silicon Valley laboratory in San Jose, California, and the lead architect for IBM Data Replication product development. Serge has been leading teams in IBM to modernize and innovate in the replication space. Serge can be reached at Bourbon@us.ibm.com
Jana Wong is the principal performance focal for Data Warehouse on-premise solutions at the IBM Silicon Valley Lab, with over 15 years of experience in Databases, SQL, QA, and Project Management. She holds a Master’s in Computer Science from the University of Rostock. Recently, she led the development and automation of a benchmark kit for validating IBM's Power10 Private Cloud Rack and played a key role in evaluating the performance of reference architectures such as IIAS/Sailfish and P10 PCR. Jana can be reached at jfitzge@us.ibm.com.